Showing posts with label Tutorial. Show all posts

18 Feb 2024

Tulips in the Studio

Just a bunch of beautiful tulips photographed in my tiny home studio today. I have included some wide shots of the lights as well so you can get a feel of my setup. Two Nikon Speedlights fired wirelessly via Nikons wonderful CLS system.


...and the pull back shots.


20 Jan 2024

Landskrona Citadel - 16mm Handheld Night Shot

As the title says took this one hand held after sunset with my Nikon 16mm f/2.8 fisheye, a tiny and incredibly sharp old style "D" lens that performs great on any full frame camera. At night I tend to shoot at -1.7EV (or whatever negative compensation works best at the time) to get closer to the actual scene in front of me instead of having the camera try to expose to what it thinks is a well exposed shot but instead (at night) is actually overexposed. I also have auto iso set between 64 and 8000 to keep the shutter speeds as high as possible in low light, combined with the -EV I can generally get sharp enough pics hand held, after all... who wants to carry around a heavy tripod and have the hassle of setting it up and tearing it down after every shot? Not this lazy guy. 😎 The final stage is to process the raw file in DxO Photolab 6 which applies its own special magic pixie dust to produce the best possible result from the original file.

Anyway, here is the photo:

16mm, 1/25s, f5.6, ISO8000, -1.7EV, handheld


24 Nov 2023

Pepper Corns

Today the subject is Pepper Corns! One light from overhead and slightly behind, pepper corns in a plate on a small table, Nikon D750 & Sigma 105mm Macro, ISO100, f16, 1/60s, SB-910 Speedlight triggered remotely via the SU-800 Commander, handheld. Spicy!


23 Nov 2023

(another) Computer Screen As Backdrop

I tried a different scene this time, more moody with a different subject, a cool little VW Beetle with groovy 60's hippy styling. Mostly the same settings as the previous post but had to tone down the flash quite considerably to get the right kind of light I was looking for.

Pull back shot.

I kinda like the effects I'm getting and will have to explore this more extensively in the future!


Computer Screen As Backdrop

I am currently off sick from work and instead of sitting around feeling sorry for myself I have withdrawn into my studio and tried something new, at least new for me because I know others have done this before.

I have used my computer screen as a backdrop, with the desktop sporting a cool Pacific Ocean scene of wide open water and clouds. The toy boat is standing on a blue sheet of cardboard and is being lit by a Nikon SB-910 Speedlight on a light stand, up and to the left, and triggered remotely via an SU-800 Commander unit mounted on a D750 with a Sigma 105mm macro lens attached. Settings: f11.0, ISO100, 1/60s, handheld and then edited in DXO PL 6.

Pull back shot.

22 Nov 2023

How Does Focal Length Influence Portrait Photos?

Just a quick test to see how portraits look at vastly different focal lengths. I used two lenses for this starting off with the 24-120mm for the wider to "normal" portrait pics and then the 70-300mm for the two longer focal length pics. I tried out the following focal lengths: 24mm, 35mm, 50mm, 85mm, 120mm, 135mm & 200mm. 

I would like to say at this point that I don't think there is any right or wrong in which focal length you prefer to use for portraits, it really is up to you and your own vision. Don't let anyone try to tell you different.

As you can see from the series of photos below the wider the focal length the more distorted the face and also more background. The longer the focal length the more compressed the face and background become.

I prefer fairly standard focal lengths for my own portraits, more specifically the 85mm for headshots and 50mm for half or full length portraits as well as environmental portraits if I have the space, otherwise the 35mm is great for environmental portraits as well.

The choice at the end of the day depends on vision, so everything goes because it's an art, not a science.

200mm

135mm

120mm

85mm

50mm

35mm

24mm

8 Nov 2023

DXO Photolab 6 DeepPRIME XD

There was a time when I used to go out with my camera after sunset when the light is just magical and of course I would drag along a tripod to keep the camera steady while using longer shutter speeds and low ISO to get the cleanest photographs possible. Those days are now behind me.

With the Nikon D850 I can use higher ISO and combined with a vibration reduction lens still get sharp & reasonably clean photographs that are perfectly usable. It really sets me free to move about as I please and get the shots I need quicker and more efficiently. However when needed I can also step up to ISO 8000 which under closer scrutiny can be quite noisy anyway, still usable but at 100% viewing size it lacks quite a bit. However the folks at DXO have solved this problem.

The following photo was taken under very low light conditions, hand held. It is sharp, nicely exposed & at normal viewing sizes it is very usable. But if I wanted to print it out at a larger size it would not be as clean as I would like. But now DXO Photolab 6 DeepPRIME XD has revolutionized how I shoot, I am free to shoot at very high ISO and still end up with a clean image to print.

First up the original, resized to use online and looking quite good. The next photo though is a 100% crop in the center of the full size image and as you can see it is very noisy. The second is a 100% crop on the DeepPRIME XD cleaned up image. It is sharp, clean and hasn't lost any detail. Very impressive result. The last photo is the full photo, cleaned up and resized to the same size as the first, uncleaned photo.

Make up your own minds but I am going to keep shooting this way because it really works for me. Well done DXO!


Oh, and I think that may be a drone above the church. Never even saw it at the time.

3 Jun 2023

Snapseed Photo Editing App

My go-to photo editor on phone and iPad is the wonderful and surprisingly adept Snapseed app which is available for free on android and Apple devices. If you have not tried it out then give it a whirl and see for yourself what the fuss is all about.

I took a portrait of the plastic model head earlier today and then converted it to jpg via RawTherapee on Linux, transferred it to my Apple phone, played around a bit with Snapseed and then transferred them back to the computer and resized in the free GIMP photo editor.

 I have posted a random selection of various versions of the portrait below for you to peruse. 

Personally I am impressed by the quality of the output from Snapseed and also that it is so wonderfully versatile & handy to use to get some interesting looks. It isn't for everyone, but it's free and it just works.

The original portrait photograph

Six examples of the Snapseed treatment:

26 Mar 2023

World's Most Patient Portrait Photography Model...

I have been taking portraits for many years, in fact the earliest photos I can remember taking were portraits with my old Box Brownie. I still have those photographs and they are some of my favourite pics of my family.

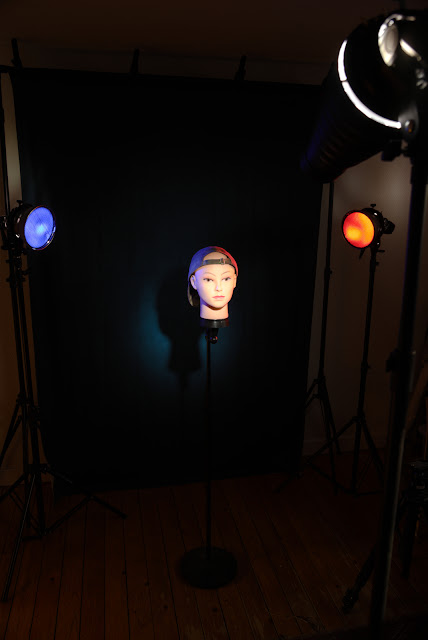
The biggest problem for me through the years has been finding patient subjects to experiment on while I try out poses, lighting configurations etc. ...but no more! I have found the ultimate model who never complains, whines that they are hungry or needs to go for a toilet break. Meet my new plastic fantastic cheapo headshot model from Amazon.

Now I can experiment to my hearts content without being pressured to feel guilty because they are tired or their neck hurts or the flash is starting to make them jumpy. (Bunch of whiners...) 😜  

Also, never blinks. It's an all round win!

These were all taken with my trusty D750 and either the 80mm f1.8 or the 24-120mm f4 at 120mm. The lights are three Nikon Speedlights, an SB-910, an SB-700 and an SB-600. All were controlled remotely in separate groups by my SU-800 Commander that allows me to adjust each light simply, easily and quickly. The light modifiers are all from Elinchrom and include softboxes, snoots, reflectors, grids, etc. and are mounted to Godox adapters that my Speedlights clamp into. I have rolls of coloured gels that I cut to size and insert to change the colour of the lights. Backdrops are either fabric mounted to a backdrop stand or the bare off-white studio wall, whichever takes my fancy at the time to achieve the look I want.
 
All photos were taken in RAW format and processed in RawTherapee on an iMac running Linux which is part of an experiment in seeing if I can adapt my workflow completely to an opensource software environment. So far it looks quite positive... more about that coming in a future post.
 
 
Plastic head is mounted onto an old mic stand from my singing days. Fully height adjustable!


22 Jun 2021

Best Travel Camera?

I have a range of different cameras, from film to aps-c to full frame to Micro Four Thirds,  but which is the camera I grab when I'm travelling, or going for a camera walk in town, or going on a motorcycle trip? Well it's my trusty and very compact Olympus OM-D E-M5mk2 and the wonderful 17mm f1.8 lens. They are truly tiny and easy to slip in anywhere or ride with while dangling from a strap. I also have the very excellent Olympus 12-40mm f2.8 PRO lens that has image quality in spades and is very versatile, but it is bigger and heavier than the 17mm by a long shot and the E-M5 always feels somewhat unbalanced with it attached. Add the very tiny Olympus 45mm f1.8 in a spare pocket to pair with the 17mm and you are covered for a good range of shots anyway. I truly hope that the MFT system stays around for a very long time, what a pleasure to carry it about!

Here is a quick comparison pic of a full frame and an MFT body side by side, add similar focal point lenses to them and the size difference grows exponentially. I know which one I would rather lug about on a trip.

Here are a couple of pics taken while travelling by motorcycle through some Swedish forest a while back:


1 Sept 2017

Wide vs Tele - Which One is Best?

I am often asked why peoples selfies make their faces look distorted and my answer is always the same, serves you right you narcissistic fool! Well no, not really. But the right answer is that the lens on your front cell phone camera is wide and therefore distorts your face making your nose look big.

In regular photography shooting with a wide lens close up has the same result, whatever is closest to the camera looks bigger and therefore the resulting picture is distorted and not a realistic representation of whatever it is you are photographing.

However, this also opens up some creative possibilities. Deliberate wide angle distortion can provide some artistic flair, or interest, or emotional tension, or merely highlight a certain part of an object or product.

I recently took some photos of my beloved motorcycle and was using my nifty Tamron 17-50mm 2.8 lens. The first photo was taken at 50mm and the second at 17mm. Which is best? Well that depends on what you are trying to achieve, your own personal taste, etc.

The tele produces a realistic representation of the subject at hand,  but to me the wide angle produces an entirely more interesting and dramatic photograph and leaves the viewer with a little more awe and wonder.  But that's just me.

Tele

Wide

So which one do you prefer?

23 Oct 2010

Strobist DIY Beauty Dish, on the cheap!

Some of you may remember that a while back I made my own flash diffuser. The original post is here. Well, I am sad to say that it was a dismal failure! In fact I couldn't tell the difference between photos taken with or without my diffusion disaster... at least it didn't cost me anything!

But for some time now I have wanted to build something more effective, a Strobist DIY Beauty Dish! Woohoo! But would it work?

Stuff I used:

1. Old flower pot
2. CD spindle case
3. White and black spray paint
4. Plain white piece of plastic
5. 4mm rivets and washers
6. White silicon
7. Stanley knife